![]()
![]()
...and follow me on Twitter: @eriknordeus
In this part of the tutorial you will make a ground, a tree, a moving camera, and a Tree Brush tool similar to the tool in Cities: Skylines.
Start by making a plane with the scale 100 positioned at the center. Give it a nice color and rename it to "Ground." Then create an empty gameobject and rename it "_Controller." Make sure it is at the center. This controller will hold all scripts we create.
Then create an empty gameobject and rename it to "Tree." As a child to that gameobject, create a cylinder, and rename it to "Wood." It should have position (0, 1, 0) and scale (0.2, 1, 0.2). Give it a material called "Wood." Then add a sphere, and rename the sphere to "Leaf," and give it a material called "Leaf." The sphere should have position (0, 2, 0) and scale (2, 2.54, 2). If you have done everything correctly you should now have what looks like a tree, where the coordinate system of the tree begins at the bottom of the tree. This will make it easier to add trees and we don't need to care about the tree's height. Also make the tree a prefab.
Now we need a script that can move the camera. This is not a tutorial on how to move a camera, so I will just give you my script. The basic idea is that we move the camera with WASD and zoom it with the mouse wheel or keys I or O. Drag the script to the camera.
using UnityEngine;
using System.Collections;

public class CameraController : MonoBehaviour {

	float height = 40f;
	float distanceBack = 40f;

	float camMoveSpeed = 30f;
	float zoomSpeed = 3f;

	void Start()
	{
		transform.position = Vector3.zero;
		//Move up
		transform.position += new Vector3(0f, height, 0f);
		//Move back
		transform.position -= new Vector3(0f, 0f, distanceBack);
		//Look at the center to get an angle
		transform.LookAt(Vector3.zero);
	}

	void LateUpdate()
	{
		//Move camera with keys
		//Move left/right
		if (Input.GetKey(KeyCode.A)) {
			transform.position -= new Vector3(camMoveSpeed * Time.deltaTime, 0f, 0f);
		}
		else if (Input.GetKey(KeyCode.D)) {
			transform.position += new Vector3(camMoveSpeed * Time.deltaTime, 0f, 0f);
		}

		//Move forward/back
		if (Input.GetKey(KeyCode.S)) {
			transform.position -= new Vector3(0f, 0f, camMoveSpeed * Time.deltaTime);
		}
		else if (Input.GetKey(KeyCode.W)) {
			transform.position += new Vector3(0f, 0f, camMoveSpeed * Time.deltaTime);
		}

		//Zoom
		float currentHeight = transform.position.y;

		float zoomDistance = 0f;

		if (currentHeight > 20f && currentHeight < 200f) {
			if (Input.GetAxis("Mouse ScrollWheel") > 0f || Input.GetKeyDown(KeyCode.I)) {
				zoomDistance += zoomSpeed;
			}
			else if (Input.GetAxis("Mouse ScrollWheel") < 0f || Input.GetKeyDown(KeyCode.O)) {
				zoomDistance -= zoomSpeed;
			}
		}
		//Can only zoom in
		else if (currentHeight > 200f) {
			if (Input.GetAxis("Mouse ScrollWheel") > 0f || Input.GetKeyDown(KeyCode.I)) {
				zoomDistance += zoomSpeed;
			}
		}
		//Can only zoom out
		else if (currentHeight < 20f) {
			if (Input.GetAxis("Mouse ScrollWheel") < 0f || Input.GetKeyDown(KeyCode.O)) {
				zoomDistance -= zoomSpeed;
			}
		}

		transform.Translate(Vector3.forward * zoomDistance);
	}
}
Now we will create a Tree Brush tool similar to the tool Cities: Skylines is using to place trees. If you haven't seen it, it is basically a filled circle that you can resize to place (or remove) trees over a larger or smaller area.
Out Tree Brush tool consists of a projector, so import Unity's standard projectors. Go to Assets → Import package → Effects → Projectors. We are here going to use the BlobLightProjector. But first you have to create an empty gameobject and rename it "Circle." Then make the projector a child of that gameobject. Position the projector at (0, 0.38, 0) and make sure the rotation is (90, 0, 0). Also check the projector's "Ortographic" checkbox, and that the projector should ignore layer "Tree." So make sure the Tree you created is at a layer called "Tree."
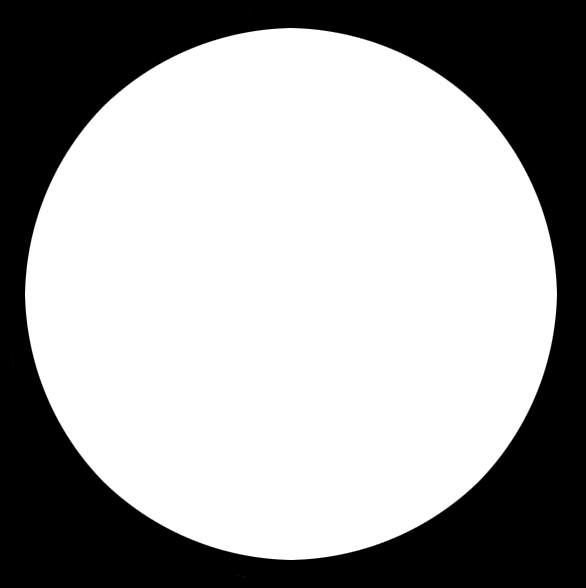
But the projector's circle doesn't look good, so we need a new one. Open the projector's material and give it a new circle by importing a circle image to Unity and then drag it to the material slot called "Cookie." I'm using this circle:
Now we need to make the circle move around with the mouse. Create a new script called "TutorialMouseMarker," and add the following to it:
using UnityEngine;
using System.Collections;

//Creates a cities skylines style round circle that
//will move around with the mouse and is resizable
public class TutorialMouseMarker : MonoBehaviour
{
    public static TutorialMouseMarker current;

    //Drags
    //The gameobject holding the projector
    public GameObject circleObj;
    //The projector that will display the circle
    public Projector projector;

    //Projector settings
    float projectorMax = 15f;
    float projectorMin = 3f;

    void Awake()
    {
        current = this;
    }

    void Update()
    {
        UpdateProjector();
    }

    //Move the circle and change its size
    void UpdateProjector()
    {
        //Find the position of the mouse
        Vector3 mouseScreenPosition = Input.mousePosition;

        RaycastHit hit;

        //Fire ray and make sure we hit ground which is layer 10
        if (Physics.Raycast(Camera.main.ScreenPointToRay(mouseScreenPosition), out hit, 1000f, 1 << 10))
        {
            //Change the position of the circle to the position
            //where the ray hit the ground
            circleObj.transform.position = hit.point;
        }

        //Change size of projector radius
        float projectorSize = projector.orthographicSize;

        //Increase/decrease with p and m keys
        if (Input.GetKey(KeyCode.P))
        {
            projectorSize += 0.5f;
        }
        else if (Input.GetKey(KeyCode.M))
        {
            projectorSize -= 0.5f;
        }

        //Make sure it can't grow too big nor too small
        projector.orthographicSize = Mathf.Clamp(projectorSize, projectorMin, projectorMax);
    }
}
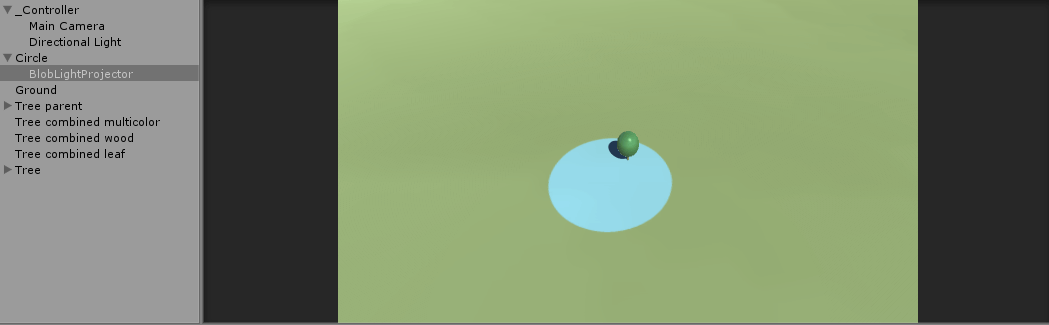
Add the script to "_Controller" gameobject and add both the "Circle" gameobject and the projector to the script. The basic idea of the script is to fire a ray from wherever the mouse is towards the ground and then position the circle where the ray hit the ground. To make this work the ray has to ignore everything else except the ground. So click on the "Ground" gameobject and make sure it is at layer 10 (We check that when we fire a ray by using the parameter "1 << 10") and give the layer a cool name like Ground.
The last part of the script above takes care of resizing the circle so we can remove trees over a larger area and add trees over a smaller area. If you now click play you should see something that looks like this (ignore the "Tree parent" and the "Tree combined" gameobjects because we will soon add them):
Now let's learn how to combine meshes with different colors into one mesh!