Source code: GitHub
![]()
![]()
...and follow me on Twitter: @eriknordeus
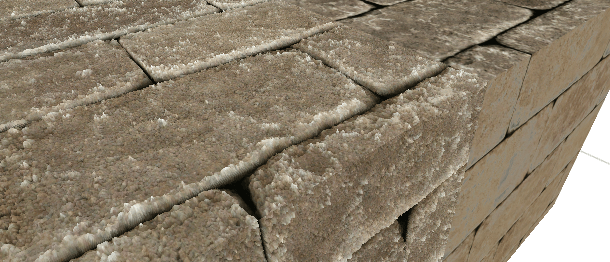
When making a game it's really important to use as few triangles as possible. But what are you going to do if you for example have a brick wall and want to make those bricks more realistic and can't add more triangles? One solution is to add a normal map, but the result is still kinda flat. Another solution is to use parallax mapping. This is a comparison between bricks with parallax mapping and bricks without parallax mapping:
Parallax mapping is a shader technique where you need to be able to write shaders on your own because you can't attach a parallax mapping shader made for bricks to simulate a landscape because you have to really tweak each shader to achive the best result. But the basic idea is the same. I'm not going to repeat what's already written, so if you want to read long articles about parallax mapping you can for example read this one: Learn OpenGL - Parallax Mapping. But I am going to tell you the basic idea:
If you are lost, maybe this image might explain it better:
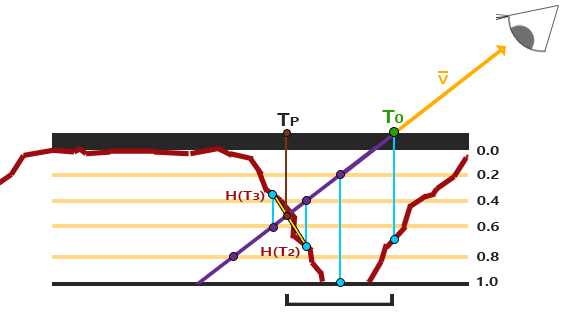
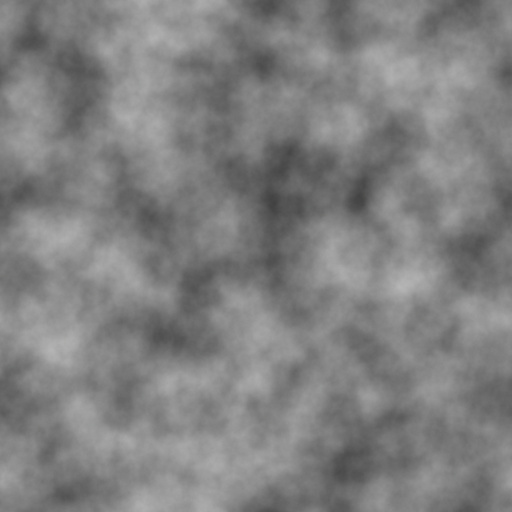
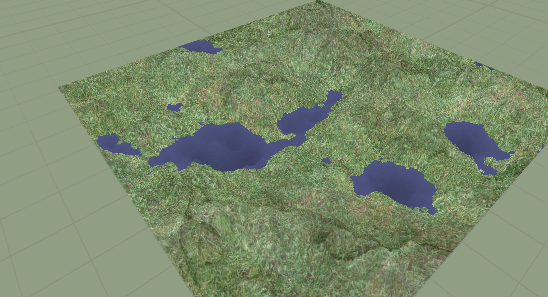
What we are going to do here is to simulate a landscape. If you are making a game where you are looking out of an aircraft window, then it's unnecessary to build the exact ground geometry with meshes, so you might as well just use a quad and parallax mapping. What you need is just a qaud, a noise texture, a mountain texture, and a grass texture. Google the mountain and grass textures, but you can use this seamless noise texture:
This is the shader code
//Parallax occlusion mapping shader that creates a landscape in a quad
Shader "Volume/MountainInQuad"
{
	Properties
	{
		_NoiseTex("Noise texture", 2D) = "white" {}
		_GrassTex("Grass (RGB)", 2D) = "white" {}
		_StoneTex("Stone (RGB)", 2D) = "white" {}
		_WaterColor("Water (RGB)", Color) = (1,1,1,1)
		_Height("Height", Range(0.0001,5)) = 1.0
	}

	SubShader
	{
		Tags { "RenderType"="Opaque" }
		LOD 200

		CGPROGRAM

		#pragma surface surf Lambert vertex:vert
		#pragma target 3.0


		//Input
		sampler2D _NoiseTex;
		sampler2D _GrassTex;
		sampler2D _StoneTex;
		float4 _WaterColor;
		float _Height;


		struct Input
		{
			//What Unity can give you
			float2 uv_NoiseTex;

			//What you have to calculate yourself
			float3 tangentViewDir;
		};


		void vert(inout appdata_full i, out Input o)
		{
			UNITY_INITIALIZE_OUTPUT(Input, o);

			//Transform the view direction from world space to tangent space
			float3 worldVertexPos = mul(unity_ObjectToWorld, i.vertex).xyz;
			float3 worldViewDir = worldVertexPos - _WorldSpaceCameraPos;

			//To convert from world space to tangent space we need the following
			//https://docs.unity3d.com/Manual/SL-VertexFragmentShaderExamples.html
			float3 worldNormal = UnityObjectToWorldNormal(i.normal);
			float3 worldTangent = UnityObjectToWorldDir(i.tangent.xyz);
			float3 worldBitangent = cross(worldNormal, worldTangent) * i.tangent.w * unity_WorldTransformParams.w;

			//Use dot products instead of building the matrix
			o.tangentViewDir = float3(
				dot(worldViewDir, worldTangent),
				dot(worldViewDir, worldNormal),
				dot(worldViewDir, worldBitangent)
				);
		}


		//Animate the uv coordinates so the landscape is moving
		float2 animateUV(float2 texturePos)
		{
			texturePos.x += _Time[0] * 5;

			return texturePos;
		}


		//Get the height from a uv position
		float getHeight(float2 texturePos)
		{
			texturePos = animateUV(texturePos);

			//Multiply with 0.2 to make the landscape flatter
			float4 colorNoise = tex2Dlod(_NoiseTex, float4(texturePos * 0.2, 0, 0));

			//Calculate the height at this uv coordinate
			//Just use r because r = g = b  because color is grayscale
			//(1-color.r) because black should be low
			//-1 because the ray is going down so the ray's y-coordinate will be negative
			float height = (1 - colorNoise.r) * -1 * _Height;

			return height;
		}


		//Combine stone and grass depending on grayscale color
		float4 getBlendTexture(float2 texturePos, float height)
		{
			texturePos = animateUV(texturePos);

			//To make it look nice by making the texture a little bigger
			float textureSize = 0.4;

			float4 colorGrass = tex2Dlod(_GrassTex, float4(texturePos * textureSize, 0, 0));
			float4 colorStone = tex2Dlod(_StoneTex, float4(texturePos * textureSize, 0, 0));

			//Height is negative so convert it to positive, also invert it so mountains are high and not the grass
			//Divide with _Height because this height is actual height and we need it in 0 -> 1 range
			float colorGrayscale = 1 - (abs(height) / _Height);

			//Combine grass and stone depending on height
			float4 mixedColor = lerp(colorGrass, colorStone, colorGrayscale);

			//Water
			if (colorGrayscale < 0.4)
			{
				mixedColor = tex2Dlod(_NoiseTex, float4(texturePos * 0.2, 0, 0)) * _WaterColor;
			}

			return mixedColor;
		}


		//Get the texture position by interpolation between the position where we hit terrain and the position before
		float2 getWeightedTexPos(float3 rayPos, float3 rayDir, float stepDistance)
		{
			//Move one step back to the position before we hit terrain
			float3 oldPos = rayPos - stepDistance * rayDir;

			float oldHeight = getHeight(oldPos.xz);

			//Always positive
			float oldDistToTerrain = abs(oldHeight - oldPos.y);

			float currentHeight = getHeight(rayPos.xz);

			//Always negative
			float currentDistToTerrain = rayPos.y - currentHeight;

			float weight = currentDistToTerrain / (currentDistToTerrain - oldDistToTerrain);

			//Calculate a weighted texture coordinate
			//If height is -2 and oldHeight is 2, then weightedTex is 0.5, which is good because we should use
			//the exact middle between the coordinates
			float2 weightedTexPos = oldPos.xz * weight + rayPos.xz * (1 - weight);

			return weightedTexPos;
		}


		void surf (Input IN, inout SurfaceOutput o)
		{
			//Where is the ray starting? y is up and we always start at the surface
			float3 rayPos = float3(IN.uv_NoiseTex.x, 0, IN.uv_NoiseTex.y);

			//What's the direction of the ray?
			float3 rayDir = normalize(IN.tangentViewDir);

			//Find where the ray is intersecting with the terrain with a raymarch algorithm
			int STEPS = 300;
			float stepDistance = 0.01;

			//The default color used if the ray doesnt hit anything
			float4 finalColor = 1;

			for (int i = 0; i < STEPS; i++)
			{
				//Get the current height at this uv coordinate
				float height = getHeight(rayPos.xz);

				//If the ray is below the surface
				if (rayPos.y < height)
				{
					//Get the texture position by interpolation between the position where we hit terrain and the position before
					float2 weightedTex = getWeightedTexPos(rayPos, rayDir, stepDistance);

					float height = getHeight(weightedTex);

					finalColor = getBlendTexture(weightedTex, height);

					//We have hit the terrain so we dont need to loop anymore
					break;
				}

				//Move along the ray
				rayPos += stepDistance * rayDir;
			}

			//Output
			o.Albedo = finalColor.rgb;
		}
		ENDCG
	}
	FallBack "Diffuse"
}
Add this shader to a material, add the material to the quad, and it should look like this:
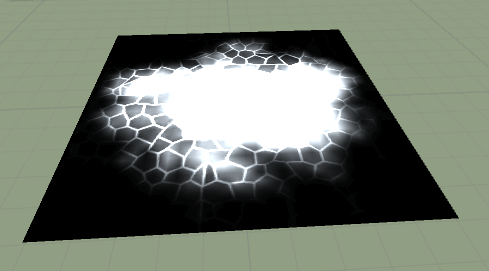
With the same basic ideas you can make other cool shaders, like a hole opening up (click for YouTube video):
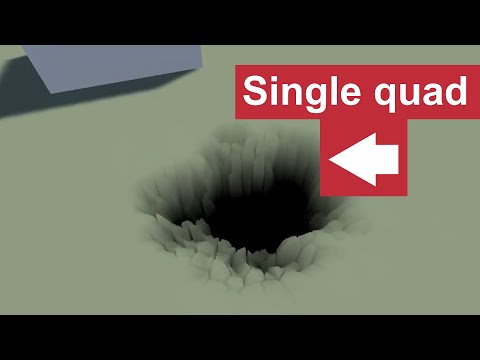
To make the hole, I used two textures: a crack texture and a "dust" texture (which is a texture with a dust speckle in the center). Then I merged the textures in the shader, and added a a slider determining how strong the dust texture should be. By moving the slider, the hole is closing/opening up. The code is available on GitHub.